Welcome to your first GreenSock / GSAP tutorial!
For this tutorial, you’ll need a basic understanding of HTML and jQuery. We’re just going to look at the fundamentals of the GreenSock (also known as GSAP) to get you started in the world of web animation.
This is what you’ll be making:
See the Pen Your First GreenSock tutorial – GSAP Basics! by adstyles (@adstyles) on CodePen.0
Intro
The world of Web Animation is full of choices. For example, do you go for CSS3 transforms or JS Animation? And with JS animation, there are a whole host of JS libraries out there, and new ones appearing all the time. Which one to choose? The reality is every project is different and for any given task, some approaches are more appropriate than others.
However, I’ve found that GSAP / GreenSock to be one of the very best of the bunch out there. It’s light, robust and once you get stuck into it, surprisingly straight forward to use. It does lots of clever stuff under the hood, which allows you to get on with honing the animation and to a large extent not worry about the compatibility of the animation working on various browsers. It’s also surprisingly good at supporting all those old browsers.
Let’s Get started
SVG is the daddy of web animation. If you’re unfamiliar with SVG, think of it as an image created in code. Because it’s built in code, the various elements of the image can thus be targeted in the same way that HTML can. You can create SVGs in any vector image program such as Illustrator or Sketch.
Download the files from Github
I’ve pre-made an SVG ready for us to animate with, if you wish you can download the .ai file and then follow the export instructions below or if you want to just get on with the animation, skip this section and work with the svg…
Exporting from Illustrator
Open the .ai file (or make your own!) in Adobe Illustrator, and then using File > Export > Export for Screens… you can export your illustrator image as an SVG.

Before you export the image, click on the settings cog highlighted in red in the image below:

The correct settings are in the image below:
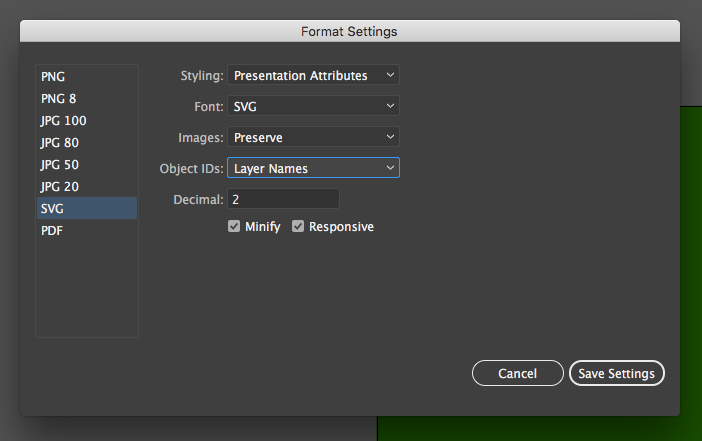

This ensures that the Illustrator layer names are exported as IDs for the various elements inside the SVG. We can then use these IDs to target the various elements in the SVG e.g. the Sock.
Here is the final SVG, ready to be animated:
See the Pen jVJqPb by adstyles (@adstyles) on CodePen.0
Get Coding
Now, pull up a basic HTML page to work in, and save this in your project folder:
Next drop in the SVG code inline, inside your <body> tags
Cool. If you open this file in your browser, you should see the static sock image. For this tutorial, we’re going to add three libraries: jQuery, GSAPs TweenMax and TimelineMax. To do so, add the following code inside of the <head> tags:
Here, we are including libraries as remote files, hosted on a CDN (of course you can download and host these files locally if you wish – just download from greensock.com or the Github repo).
Once you’ve added the Scripts, you’re ready to animate wth Greensock.
Setup the animation
Add some <script> tags to your <head>, and inside them, add a $(document).ready function like so:
We will be adding all our Javascript inside this $(document).ready function. The reason we do this is to make sure everything else on the page is loaded up before firing off the Javascript. If you don’t wrap everything in the $(document).ready, it may try to run the animation before the SVG and the other dependancies have loaded and you’ll get an error.
Next, we’re going to target the various elements of the SVG using jQuery and save them in some variables. This will make it easier to target these elements when we come to animate them.
Next, we’re going to ‘setup’ the animation so that we have it ready before the animation starts to play. For example, we want the sock to ‘appear’ and float up on the screen, so to create this effect we first must hide it and move it down from it’s current position. You can do this like so:
Let’s break that down a bit:
TweenMax.set(); – this is the ‘set’ function we get from Tween Max, inside the brackets we are going to declare what we want to change and what attributes we want to set it to have.
$sock, – this is the element that we wish to change, the sock, and we are using the variable we declared earlier to do so. Note the comma after the target element, it’s very important as it’s used as the separator between the target and the attribute list.
{scale:0.5, y:’+=100%’, transformOrigin:”50% 50%”}, – These are the attributes we will be assigning to the element. They are wrapped in { } and separated by commas. In this example:
scale:0.5 – we’re changing the scale (size) of the element to 0.5 or 50%
y:’+=100px’ – here we’re targeting the elements position on the Y axis (vertical). By using += we’re adding 100px to the elements position on the y-axis
transformOrigin:”50% 50%” – this one is slightly different in that it doesn’t visibly change anything by itself. It’s actually defines how some of the other attributes affect the element. The default transformOrigin is set to the co-ordinates of 0 0 of the element (i.e. the top right corner). By setting the transformOrigin to 50% 50% it means changes such as scale, scale from the centre of the element. To best see the difference, you can experiment by removing this attribute and seeing the difference.
Here are all the vars and TweenMax.set rules we will use, wrapped in the $(document).ready:
You can see we’re using the variables we made earlier, and then setting the visual attributes on them. For example, the variable $allElements is a variable that targets the sock, zaps and shadow, and then with this line TweenMax.set($allElements, {opacity:0}); we are targeting all those elements and setting their opacity to 0 (i.e. invisible).
If you look at the page now in your browser, you’ll see the elements are gone and it’s just a green square! This is the starting point of our animation.
Now, before we start adding animation we need to define our Timeline, like so:
var tl_scene = new TimelineMax();
TimelineMax is an optional library for GSAP, but it’s so useful I rarely make a project without it. TimelineMax allows you to chain multiple ‘tweens’ (animations) together to build up a complex animation that’s easy to tweak and change.
Now on to the Timeline
We’ve already defined the timeline we’re going to use, ‘tl_scene’, so now it’s just a case of building up the animation line by line. Let’s add one line of animation to the timeline:
Now, let’s breakdown this line:
.to($sock, 1, { opacity:1, scale:1, y:’-=100px’, transformOrigin:”50% 50%” }, ‘showSock’)
You can see the similarity from the previous .set line above, the difference here is there are a few more attributes (again divided by commas)
.to – Rather than .set, we are instructing the element to change to the attributes set (you can also use other directives such as .from or .staggerTo)
$sock, – The element we are targeting (as before)
1, – This is the time, in seconds, the transformation will take.
{ opacity:1, scale:1, y:’-=100px’, transformOrigin:”50% 50%” } – The attributes we are changing on the element. Opacity: 1 fades it in, scale: 1 returns the element to the original side, and the y:-=100px is the inverse of the .set attribute we declared, so in effect putting the sock back where it was.
, ‘showSock’) – this final attribute is the label for this action. Timelines allow you to chain together animations. The natural flow of these is chronological, so when one animation finishes, the next one begins. Declaring a label (as in this example), creates a labelled moment in the timeline. This then allows you to break the chronological flow and instead, make animations start at the same time, by using the same label.
Refresh your browser page and you should now see an emerging sock – we’re getting somewhere!
Now we’ve got an emerging sock, we can get cracking with the animation. Lets make the sock float up, and while it’s floating up, let’s make the electricity zaps will appear. Then, when we make the sock float down, we’ll make the zaps disappear again.
So each line is an animation directive, manipulating the attributes of an element or elements over a period of time. To make animations happen at the same time, we can use labels.
In this example we are changing a few properties: scale, position, opacity, etc. But there are so many things you can do with GSAP – basically anything CSS can style you can animated with GSAP. Here’s a showcase of the kind of effects you can build up with GSAP (from the greensock.com homepage):
0
(Click the rerun button if the animation has finished)
If you’re interested, here’s a link to a GSAP Properties Cheat Sheet from @lunelson
StaggerTo
Most of the directives are .to but some are .staggerTo – so what’s the difference?
TweenMax.StaggerTo allows us to target a group of elements, and change the attributes of each one, but rather than changing all at once, the animation of each element is staggered. Thus, each element in the group has the same animation but offsets the start of each one by a second parameter.
staggerTo($dark_zaps, 0.4, { opacity:1, scale:1, transformOrigin:”50% 50%” }, 0.1, ‘hover-up’)
0.1, – This extra parameter is just for a staggerTo and it shows the offset between each staggered animation firing, in this case delaying each one firing by 0.1 seconds. A really nice effect, achieved easily with GSAP Timeline.
Some Functions!
One of the man advantages of using GSAP (and JS Animation generally) is that we can use JS functions to control these animations. This is where interaction can lie, so you can make an animation respond to a users actions – one of the best things about web animation!
Let’s put in two functions, one to restart the timeline, and one to make the floating sock loop over.
$(‘svg’).click – This is a standalone function that fires when the user clicks on the SVG.
tl_scene.play(0); – This is the line is fired, and it instructs our timeline to play from the very beginning by using a zero inside the brackets: .play(0);
Add this code to the page and try clicking on the SVG.
Next, we’ll add a function, but this time we’ll add it to the Timeline declaration we made earlier. So go back up to this line:
and replace it with this:
Here, we’re adding in an option to the Timeline declaration. There are lots of useful options you can add in here, but we’re going to add just one which is called onComplete. This allows us to fire a function off when the timeline comes to an end.
The function is a simple one, and is similar to the previous example. The difference is we are instructing the timeline to start playing from one of the labels we made earlier:
tl_scene.play(‘hover-up’);
So now we’ve effectively created a loop as whenever the timeline ends, it’s reset to the hover-up label, and so on. And, because the position of the sock and the opacity of the zaps is exactly the same at both the end of the timeline and at the position of the hover-up label, there is no jump in the animation and the loop carries on endlessly!
A few more touches
Add some CSS to the head within some <style> tags to make the SVG central and the background of the HTML the same colour as the background of the SVG. This will make it look a bit better on the screen 😉
Easeing
I also added this line above our variables. This is a handy tip that sets the default ease of the animation. The ease is the way the animation happens. Rather than keeping the same consistent speed, a custom ease allows for a more natural movement. Think of it a bit like the way a car moves – accelerating up gradually to a cruising speed, or decelerating gradually to a stop. You can define the type of ease in the Attributes of that particular tween (e.g. ease: Power2.easeInOut ). If no ease is specified, the default is ‘linear’ but this changes to default to something a bit smoother! TweenLite.defaultEase = Expo.easeOut;
Here is a Ease Visualiser from Greensock to give you a flavour of the eases you can use:
0
All done!
That’s it! Here’s the final effect:
See the Pen Your First GreenSock tutorial – GSAP Basics! by adstyles (@adstyles) on CodePen.0
You can download the final, complete code and assets for this project here:
Download the files from Github
Just the start!
Of course, this is just the beginning – hopefully I’ve explained a few of the tips and techniques to get you started in GSAP animation. Please play around with this code and see if you can manipulate the sock animation in your own way – change the values or add new attributes (try rotation: 180 or try changing the zap colours with fill: #000.
If you like the tutorial please share, and leave any comments you have below!
Hope you enjoyed the tutorial!